
Disclaimer
The configuration described in this article is to improve LAN client devices protection and privacy on the Internet, so it’s a very specific type of configuration that can be useful to offices and Enterprises that wants to:
- Improve their level of privacy when accessing the Internet
- Maintain full control and visibility of what is going on in the LAN (so, for example, your IDS can still see which domains are being requested for resolution, while your ISP won’t see the forwarded requests)
- Improve the level of protection of the clients without installing extra software on them
- Maintain good performance on DNS Name resolution (this because DNS over TLS is obviously slower than classic DNS, so BIND will work as a cache and can also be configured to be authoritative for local resolution and we’ll use a local stubby to forward BIND requests to Quad9 via TLS)
So, it’s not a solution that can replace the usage of IDS systems, IPS, Antivirus and more sophisticated Cyber Security measures! However, it helps to improve protection and privacy on the Internet without sacrificing performance.
What is Quad9?
Quad9 is a free Domain Name System package that automatically blocks malicious websites, it’s developed by IBM Security in collaboration with non-profit research bodies Packet Clearing House and the Global Cyber Alliance.
Quad9 also claim they don’t store our IPs (hopefully they are being honest on this). However, if they are not being honest on this, on a next article we’ll see how we can hide our IPs from being stored by Quad9 (so, if you want anonymity as well, stay tuned for the next one!).
Please Note: DNS alone is not sufficient to block all types of malware (or block all types of malware “calling base” techniques), but it can be really useful to improve security by blocking queries for bad domains.
What would make Quad9 even better is if we could forward requests to it in an encrypted way, so to improve our privacy as well. But wait a second… Quad9 actually allows us to query it via TLS!!! 🙂
So, what if we could configure our local DNS Server to forward Quad9 queries for remote systems via TLS? Turns out we can, with a little effort…
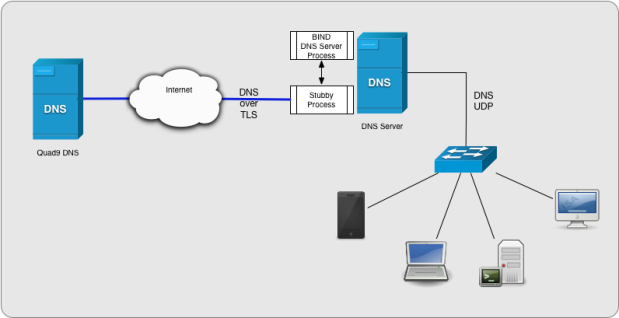
How this idea of using BIND with Quad9 works?
In this configuration your internal clients will keep working as usual and use DNS over UDP to query your DNS Server (BIND), so this approach works with every type of clients (mobiles devices, PCs, IoT devices and even old vintage computers like Amiga, RISC OS, Atari etc). However, if BIND cache does NOT have the entry for a specific query, it will forward the query to a local Stubby instance (via localhost on port 8053) and Stubby will establish an encrypted connection to Quad9 over TLS, forward the query to Quad9 that will resolve it and then send back the answer to Stubby, Stubby to BIND and BIND to the client via UDP.
If BIND as the answer cached then it will answer quickly to your client keeping performance good.
So, queries are sent outside in an encrypted way (improving your privacy on the Internet), while they are still managed in a non encrypted way inside your LAN.
Because of that, if you have an IDS/IPS system controlling traffic on your LAN, it will still be able to analyse the DNS Request made by a client and, eventually notify you with an alert (or, for IPS, by blocking the query before it reaches BIND). So, you’ll still have complete visibility/control over what’s going on in your LAN. Moreover, If your IPS doesn’t have a match for a malicious domain (aka false-negative situation), you still have a chance that it may be blocked by Quad9 and so you have an extra layer of protection.
Since you can provide the internal DNS IP to all your clients automatically via DHCP, this approach requires no special configurations on clients and works well with mobile devices.
Installation and Configuration
This article assumes your DNS Server is running on a Linux box and it’s BIND. Here is a list of Linux distros supported in this article:
- CentOS 7.X, RHEL 7.x, Fedora, HyperiOS 2.x and PacketLinux 2.x
- Debian (buster, stretch), Ubuntu 16.x, Kali 2017.x/2018.x
If you are not using one of the distros above, you can still try what is described here below (I also give you some info on how to do it from source code), however I do not support this approach for production environments and such.
First off, connect to your Linux box as root or with a sudo user account and follow the instructions below:
1. Enable required repositories:
– On CentOS, RHEL and HyperiOS make sure you install epel repository first:
sudo yum install epel-release -y
– On Ubuntu make sure you have the universe repository enabled.
– On any other Linux, non supported in this article, you can install Stubby from the source, here is a link to it’s repository on github:
git clone https://github.com/getdnsapi/stubby.git
To compile Stubby from source on your Linux follow the instructions on the README, however I do not recommend this approach on a production system, where you prefer to use a Package and make sure it gets updated constantly for bug and security issues.
2. Install getdns:
CentOS, RHEL, Fedora, HyperiOS, PacketLinux:
sudo yum install getdns getdns-stubby -y
Debian, Ubuntu, Kali:
sudo apt-get install getdns-utils -y
3. Configure stubby configuration file:
sudo vi /etc/stubby/stubby.yml
4. Make sure the following options are set as here:
dns_transport_list:
- GETDNS_TRANSPORT_TLS

tls_authentication: GETDNS_AUTHENTICATION_REQUIRED

listen_addresses:
- 127.0.0.1@8053
- 0::1@8053
5. Comment out all upstream preconfigured servers (they are for privacy and we want also security provided by quad9, so we’ll use quad9 only, but you can decide what is best for your personal use of course!)
6. Add Quad9 for both IPv4 and IPv6 resolution:
# Quad 9 IPv4 service
- address_data: 9.9.9.9
tls_auth_name: "dns.quad9.net"

# Quad 9 IPv6 service:
- address_data: 2620:fe::fe
tls_auth_name: "dns.quad9.net"
Please note: On newer releases of Stubby they already included Quad9 DNS Data so you can also simply search in the configuration file and uncomment the correspondent lines
7. Save and Close
8. Edit your BIND configuration (I assume you have NAMED already installed)
sudo vi /etc/named/named.conf
OR (if you have bind chrooted):
sudo vi /var/named/chroot/etc/named/named.conf
9. remove or comment out your old forwarders IPs and add this one as the only forwarder IP:
forwarders {

    127.0.0.1 port 8053;

}
10. Save and close
11. start stubby
systemctl start stubby
12. restart named:
systemctl restart named
OR (if you have named chrooted):
systemctl restart named-chroot
You’re done, now it’s time to test and troubleshoot your new configuration!
Let’s test DNS over TLS on BIND and Stubby
If we have set everything correctly when you started stubby and named they both started without any error. If there was some issues you can check what happened using systemctl status named or stubby depending on the error message you have received.
To make sure queries are being forwarded encrypted we need to use a tool like Wireshark for example to sniff the traffic and check and, to generate the query we can use a tool like dig:
dig www.zfpsystems.com
Make sure you have Wireshark loaded and capable to sniff your DNS Server traffic before you run your test with dig and that is recording packets.
Figure here below shows how the mechanism work and what you should see if you’ll capture traffic on your DNS Server with tcpdump and display it in Wireshark (in this example the DNS VM has IP 192.168.101.100 and the LAN client has IP 192.168.101.125):

As you can see from the picture:
- Client queries the DNS Server VM using standard DNS UDP Protocol (so your IDS/IPS can see which domain or reverse lookup has been requested), Packet 37 in the figure.
- DNS Server does not have the domain in cache, so it forwards the request to Stubby (also installed on the same server and it’s via localhost, so not visible on the picture since the capture was on the NIC port.
- Stubby (on DNS Server VM) queries Quad9 using TCP and TLS 1.2, packet 38 in the figure.
- Quad9 answers back to Stubby via TCP and TLS 1.2 (obviously), packet 39
- Stubby sends the response to BIND DNS Server via localhost
- BIND sends its response to the client via DNS UDP standard protocol in the LAN, packet 43
If all works well on your configuration then you can set BIND and Stubby to start up automatically when you boot your DNS Server by executing:
systemctl enable named
OR (if you have chrooted named):
systemctl enable named-chroot
And then stubby
systemctl enable stubby
Ok that’s it for now, thanks for reading and I hope you’ve found some useful information here. If you enjoyed this post, please don’t forget to support my blog by:
- Visiting my on-line hacking and engineering merchandise shop on redbubble.com by clicking here
- Or you can also make a donation with the PayPal link in the column on your right
- Or share this article
If you like my articles and want to keep getting informed on new ones you can follow me on on of those 21st Century thingies called Facebook, Twitter, Instagram or Pinterest
And as always if you have any questions please feel free to use the comments section below.
Thank you! 
